This guide provides a comprehensive overview of the White-Label / Private-Label features available to partner organizations. These features enable organizations to customize profile presentations, manage content workflows, and integrate listings into their own websites and applications.
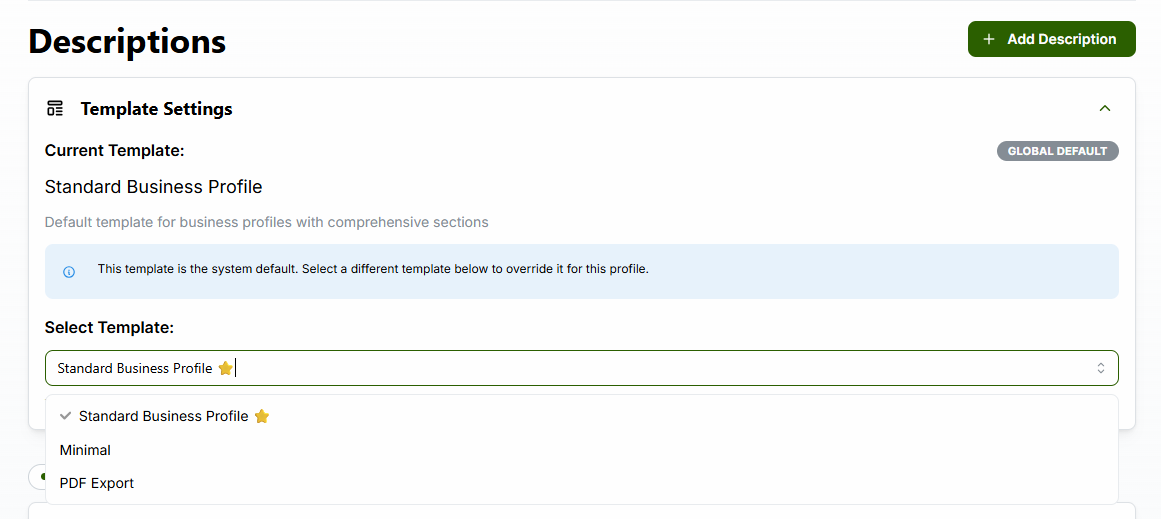
Templates allow organizations to customize how business profiles are displayed, including renaming and relabeling the horizontal navigation tabs.
Choose from available templates or create custom templates for your organization. The dropdown shows available templates including “Standard Business Profile”, “Minimal”, and “PDF Export”.
Blue labels display the page structure, making it easy to understand
how content is organized. Each section shows its type (e.g.,
revenue_line_chart, financial_table,
description, document_list,
excel_table), unique ID, and order number.

Upload and organize documents and photos with type-based categorization for better organization and retrieval.
Upload business documents with type categorization. Available document types include: - Financial: P&L Statement, Balance Sheet, Tax Returns, Cash Flow Statement - Legal: Articles of Incorporation, Lease Agreement, Contracts

Upload photos with drag-and-drop support. The interface shows existing images in a gallery view with an upload area below for adding new photos.

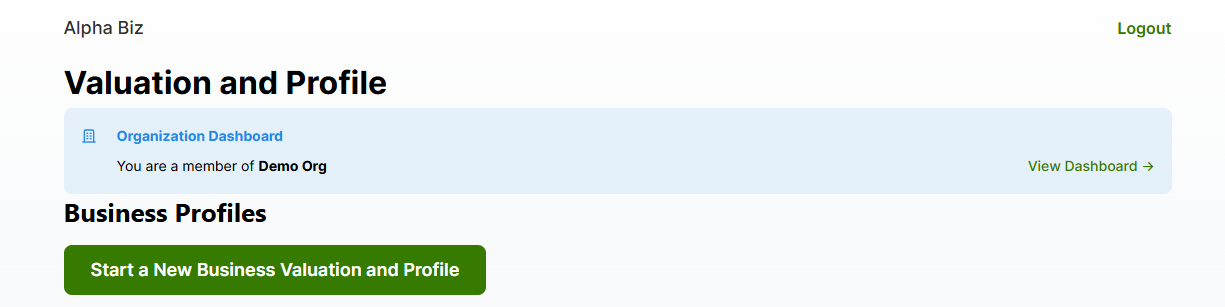
Publish and share business listings to your organization’s white-label domain, enabling seamless integration with your branded website.
Access the listing sharing features from the home page. Organization members see a banner with “View Dashboard” link.
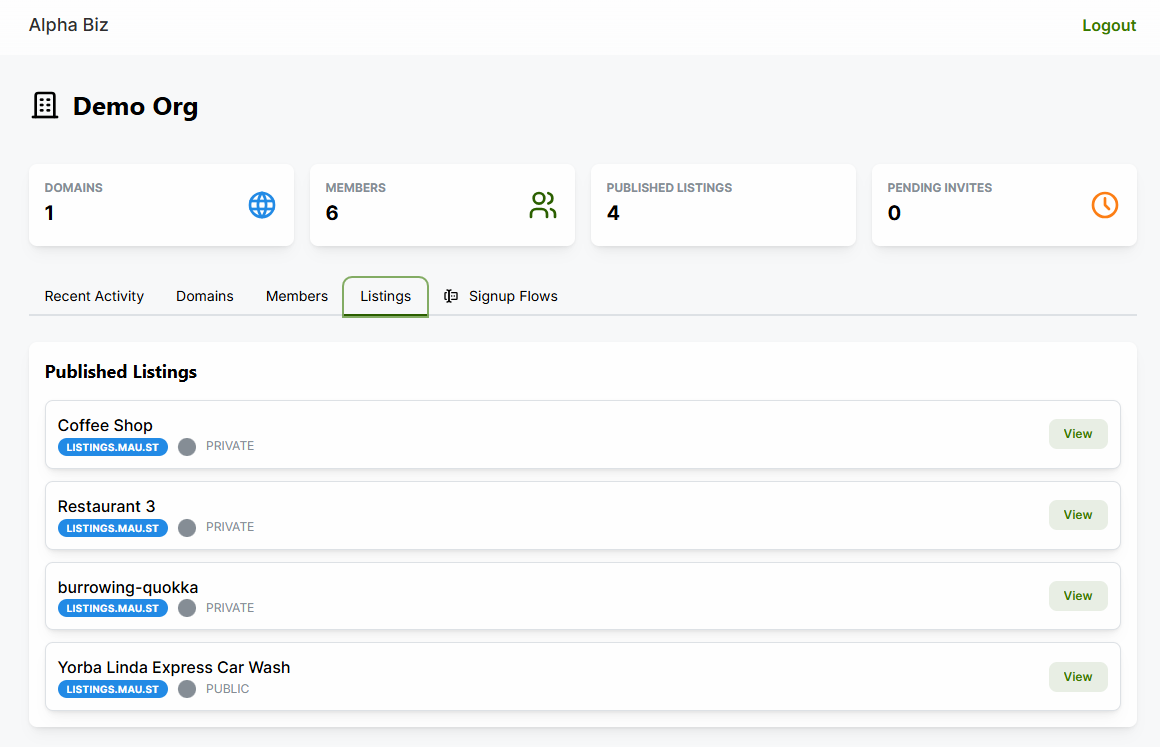
The organization dashboard shows all listings currently shared to your organization. Each listing displays: - Business name - Domain badge (e.g., “LISTINGS.MAU.ST”) - Visibility status (PUBLIC/PRIVATE) - View button to access the listing
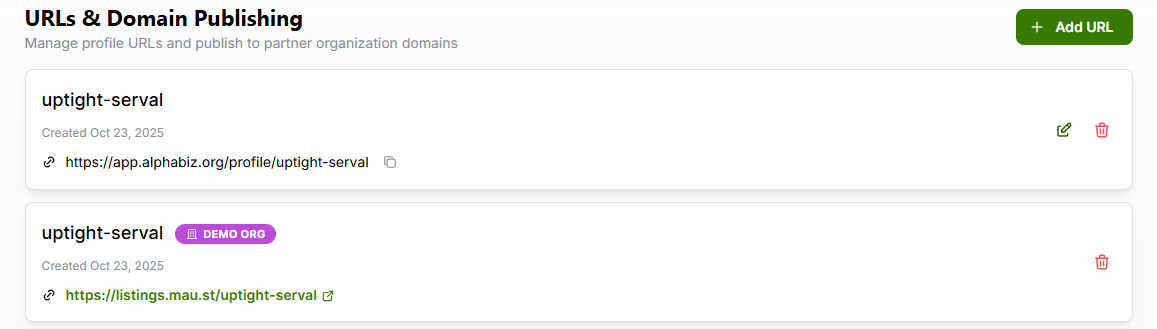
Manage profile URLs and publish to partner organization domains. The unified interface shows: - Main profile URL on the primary domain - Partner domain URLs with organization badges (e.g., “DEMO ORG”) - Edit and delete options for each URL
Access technical documentation and embed codes for integrating listings into external websites. The sample page demonstrates: - Widget configuration controls (organization ID, view mode, theme, columns) - Three embed methods: Web Component, iFrame (Direct), iFrame (via JS) - Live preview of the embedded widget - Copy-ready code snippets
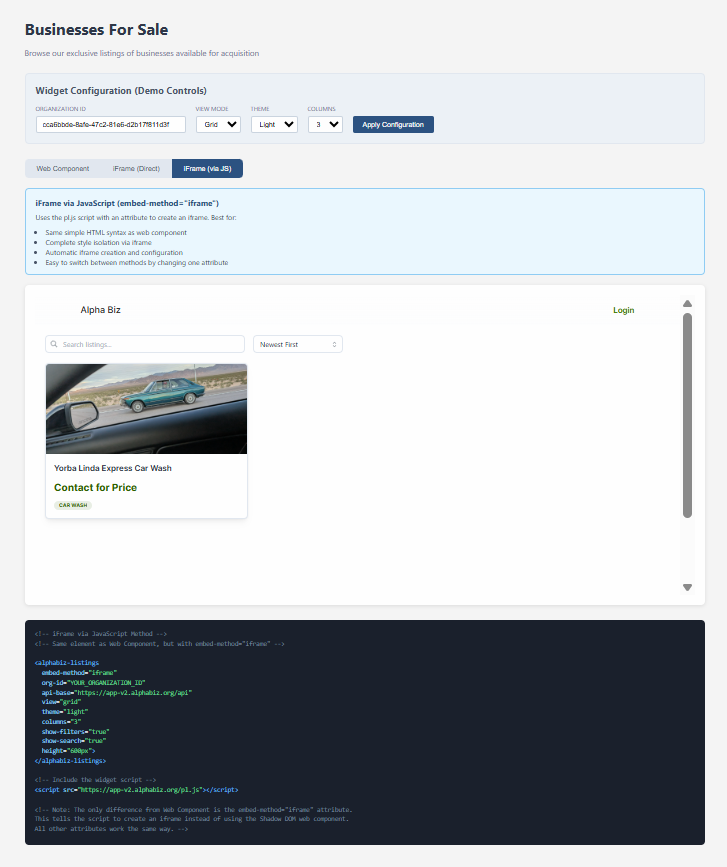
For website integration, use the embeddable listings widget:
<alphabiz-listings
  org-id="YOUR_ORGANIZATION_ID"
  api-base="https://app-v2.alphabiz.org/api">
</alphabiz-listings>
<script src="https://app-v2.alphabiz.org/pl.js"></script>
See EMBEDDABLE_LISTINGS_WIDGET.md for complete
documentation.
A robust approval workflow ensures content quality and consistency across all published profiles.
flowchart LR
    DRAFT[DRAFT<br/>Editing] -->|review & approve| APPROVED[APPROVED<br/>Published]
    APPROVED -->|make changes| DRAFT

    style DRAFT fill:#fef3c7,stroke:#f59e0b,color:#000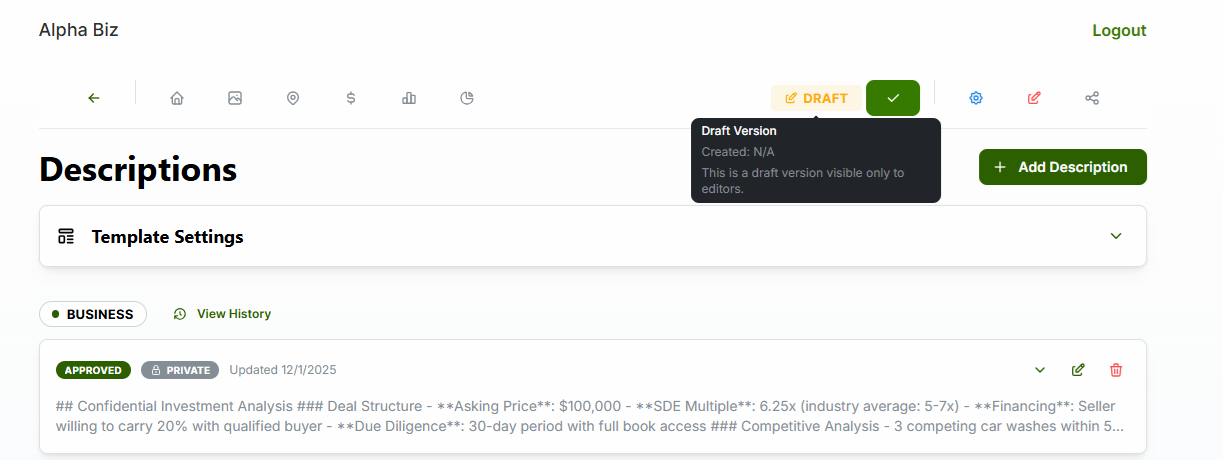
style APPROVED fill:#d1fae5,stroke:#10b981,color:#000The profile header shows a “DRAFT” badge with tooltip explaining the status. Clicking reveals version details including creation date and visibility information.
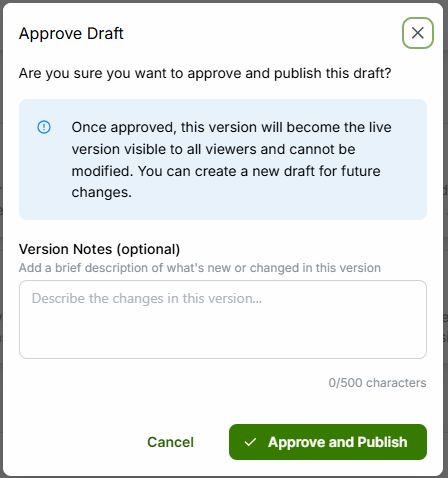
When ready to publish, click the approve button to open the confirmation modal. Features include: - Clear explanation of what approval means - Optional “Version Notes” field (up to 500 characters) - Cancel and “Approve and Publish” buttons
Create dual versions of descriptions: one for public viewing and one with full details for authenticated users.
| Level | Visibility | Use Case |
|---|---|---|
| PUBLIC | Anyone, including unauthenticated users | Anonymized, safe-for-public content |
| PRIVATE | Authenticated users with permission | Full details including sensitive information |
The descriptions page shows all description types with their privacy levels. Each description displays: - Description type badge (e.g., “LOCATION”, “BUSINESS_OVERVIEW”) - “REQUIRED BY TEMPLATE” indicator when applicable - Approval status (APPROVED/DRAFT) - Privacy level badge (PUBLIC/PRIVATE) - View History link for version tracking
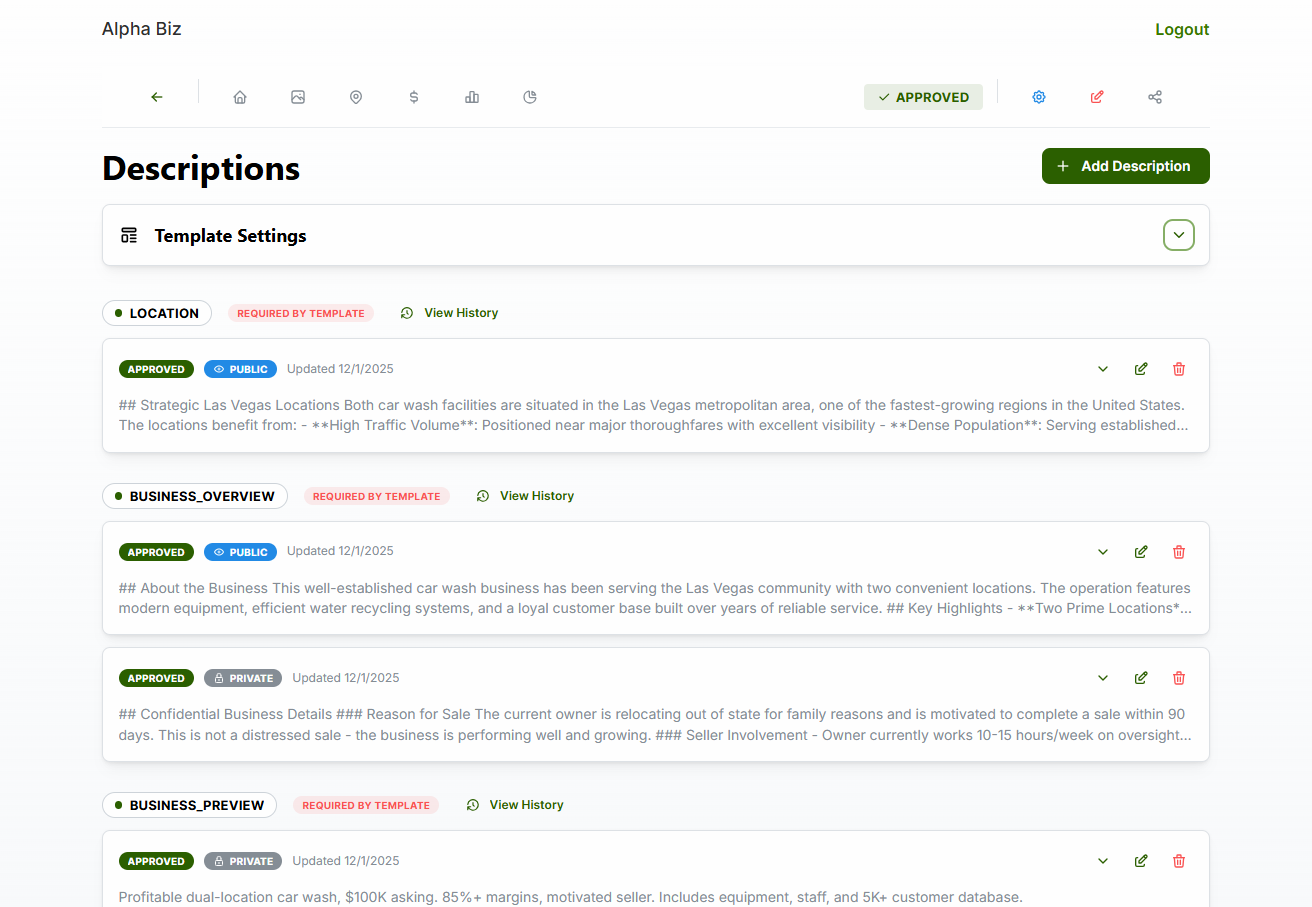
When editing a description, use the Privacy Level toggle to switch between Public and Private versions: - Private: Contains confidential details (lock icon) - Public: Anonymized version safe for public viewing (eye icon) - Rich text editor with markdown support - Save and Cancel buttons
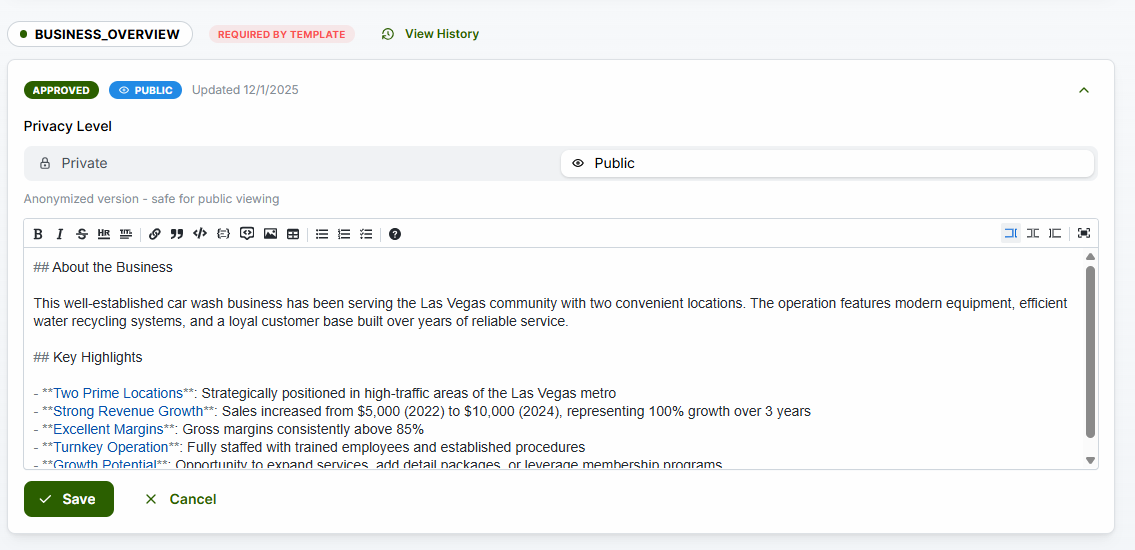
PUBLIC Version (shown to unauthenticated users): > “This well-established car wash business has been serving the Las Vegas community with two convenient locations. The operation features modern equipment, efficient water recycling systems, and a loyal customer base built over years of reliable service.”
PRIVATE Version (shown to authenticated users): > “## Confidential Business Details ### Reason for Sale The current owner is relocating out of state for family reasons and is motivated to complete a sale within 90 days. This is not a distressed sale - the business is performing well and growing. ### Seller Involvement - Owner currently works 10-15 hours/week on oversight…”
Create customized signup experiences for your organization with configurable steps and valuation calculator integration.
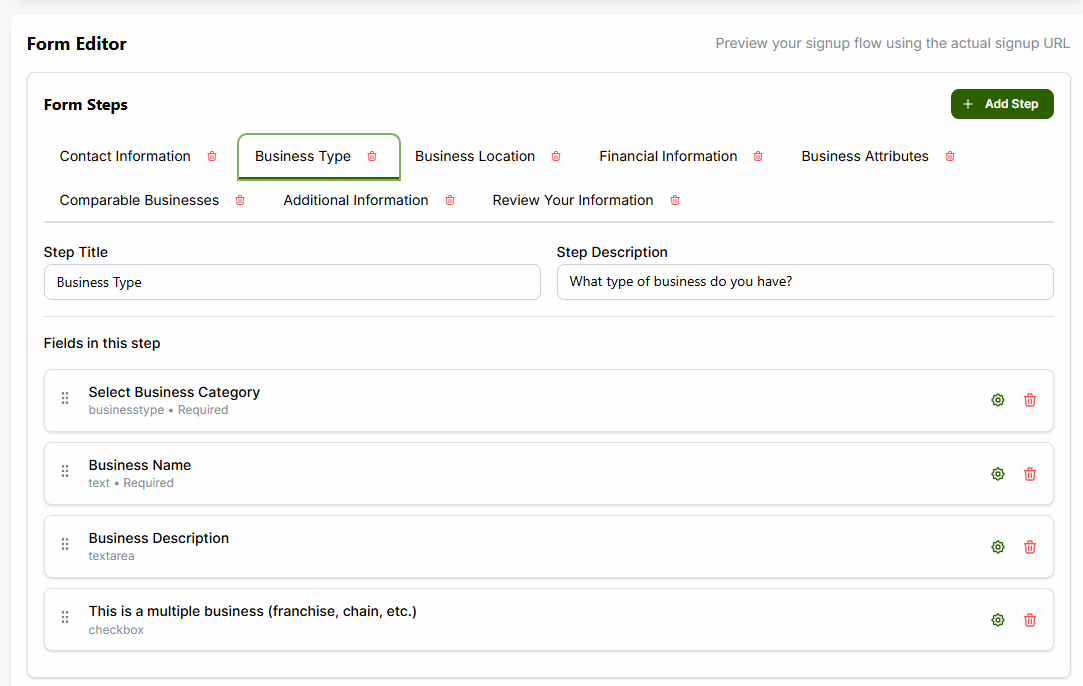
Configure these steps in your signup flow: - Contact Information: Capture user details - Business Type: Industry category selection with business name and description - Business Location: Address and geographic information - Financial Information: Revenue, expenses, and cash flow data - Business Attributes: Risk factors and years in business - Comparable Businesses: Similar business comparisons - Additional Information: Custom questions - Review Your Information: Summary before submission
The Form Editor allows you to configure each step of the signup flow: - Form Steps: Tabs for each step with delete buttons - + Add Step: Button to add new steps - Step Title: Customizable title for each step - Step Description: Help text shown to users - Fields in this step: Drag-and-drop field configuration - Field Settings: Gear icon to configure each field - Preview: Link to test the actual signup flow using the signup URL
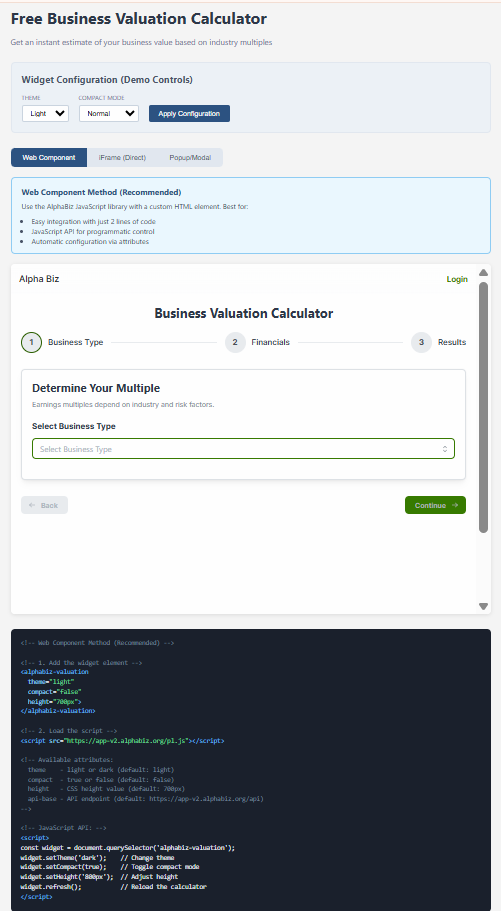
Embed the valuation calculator on external websites with full customization: - Theme: Light or Dark mode - Compact Mode: Normal or Compact layout - Multiple embed methods: Web Component, iFrame (Direct), Popup/Modal - JavaScript API: Programmatic control for theme, compact mode, height, and refresh
Direct users to your custom signup:
https://app-v2.alphabiz.org/signup/YOUR_ORG_CODEUse the web component for easy integration:
<alphabiz-valuation
  theme="light"
  compact="false"
  height="700px">
</alphabiz-valuation>
<script src="https://app-v2.alphabiz.org/pl.js"></script>